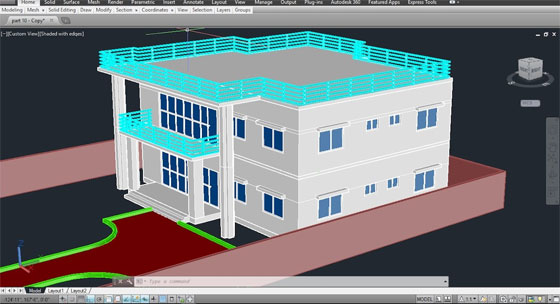
How to apply AutoCAD for transforming a 2D model to 3D form

With the use of AutoCAD's "Extrude" and "Revolve" commands, it becomes easier to transform 2-D designs into 3-D models. "Extrude" refers to the method for expanding a 2-D shape into 3-D space.
AutoCAD accomplishes it by initially expanding a new axis at right angles to the 2-D axes on which your 2-D design prevails. It then replicates the 2-D shapes which are going to be expanded at a higher location on the axis, whereas maintaining the original shapes at the base of the axis. As soon as 2-D design is transformed to 3-D, display it with realistic lighting and shadows with the "Render" command on the Render tab.
1. Go to the "File" menu and choose the "Open" command from the context menu. Manage an AutoCAD file with a 2-D model that should be transformed to 3-D and double-click on it. AutoCAD will load the file for you to transform.
2. Type "Perspective 1" to specify that the design should be demonstrated with perspective. It means that parallel lines will become visible to be merged as they perform in the physical world. This option is considered as very pragmatic as compared to parallel projection.
3. Select the “cube” icon situated at the top right of the canvas and then drag the mouse unless the top, right and front sides of the cube are noticeable. It modifies the viewpoint from 2-D to 3-D that facilitates to view the three-dimensionality of the 3-D form that is going to be generated from the 2-D model.
4. Click the drop-down list located at the top of the application window, then opt for the "3-D modeling" item to modify the workspace to one that illustrates tools for generating and editing 3-D objects. Click the "Home" tab to avail the "Modeling" panel, that demonstrates the "Extrude" tool for transforming rectangular 2-D shapes into block-like 3-D forms.
5. Click the "Extrude" button; then select a shape of your 2-D model that should be converted into a block form, as contrary to a cylindrical or spherical form. Press "Enter." The chosen shape will be stretched to 3-D space and the top of the box developed from the shape will be attached to your cursor. Drag the cursor unless the box attains the preferred height, and then click the mouse to finish the extrusion. Apply the "Extrude" command on the left over parts of the 2-D model that should be extended into blocks.

6. Click the "Surface" tab and get to the "Create" panel to discover the "Revolve" command to produce cylindrical, spherical and other round forms from 2-D shapes. Select this command, and then click a shape in your 2-D model that should be transformed into a cylinder or other round form. Provide the axis around which the shape should be rotated, which can be "x," "y," or "z." Press "Enter" to perform the revolution, then rotate the other parts of your design that should contain round 3-D forms to finish the conversion of your 2-D design to a 3-D model.
Source: smallbusiness.chron.com
